
How to Upload and Use External Video Clips
You can add your own video and audio clips to any Vocal Video: b-roll, a logo animation, an intro or outro, or testimonials you recorded before you started using Vocal Video. Upload a clip right inside the editor, reuse it from your Uploads library, or start a new draft video from it.
In this article:
- Upload a clip while you edit
- Add a clip you've already uploaded
- Replace a scene's clip with Swap Media
- Start a new draft video from an upload
- Your Uploads library
- Embedding uploaded clips and adding them to galleries
- AI effects and logo animations
- Background music
- Can I share my screen when recording with Vocal Video?
Upload a clip while you edit
There are two places to add a scene in the Video Editor, and both open the same menu:
- The + between scenes: hover between two scenes in the scene list (or on the timeline) and click +. Your clip is inserted at exactly that spot.
- The Add Scene button: the Add Scene button in the playback bar under the preview adds the clip to the end of the video. You can drag it into place afterwards.
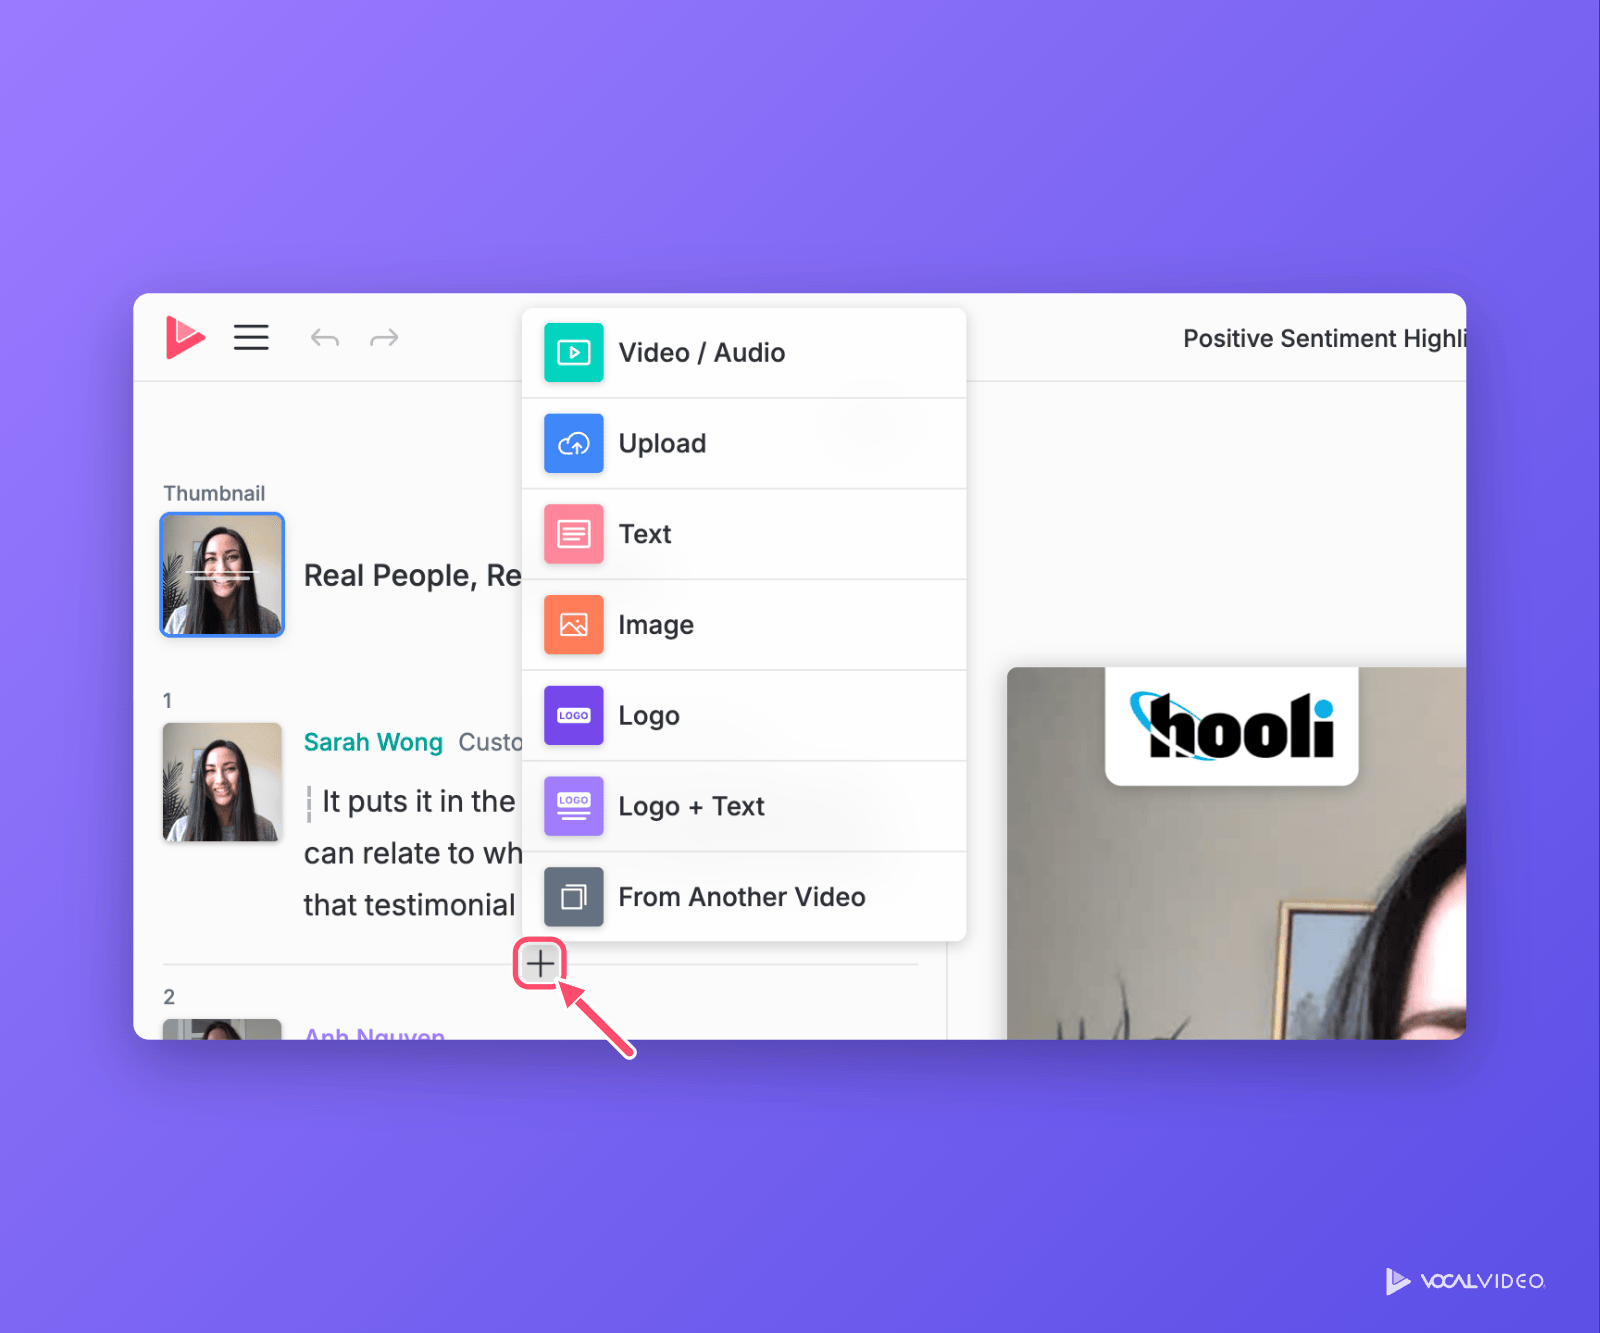
To upload a new clip:
- Click + where you want the clip, or Add Scene.
- Choose Upload.
- Give the clip a Clip Title (only you see this). If the clip shows one person talking, fill in Speaker Name and Title / Description under Attribution so their name tag appears.
- Drop your video or audio file onto the form, or click to browse.
- Click Create Scene.
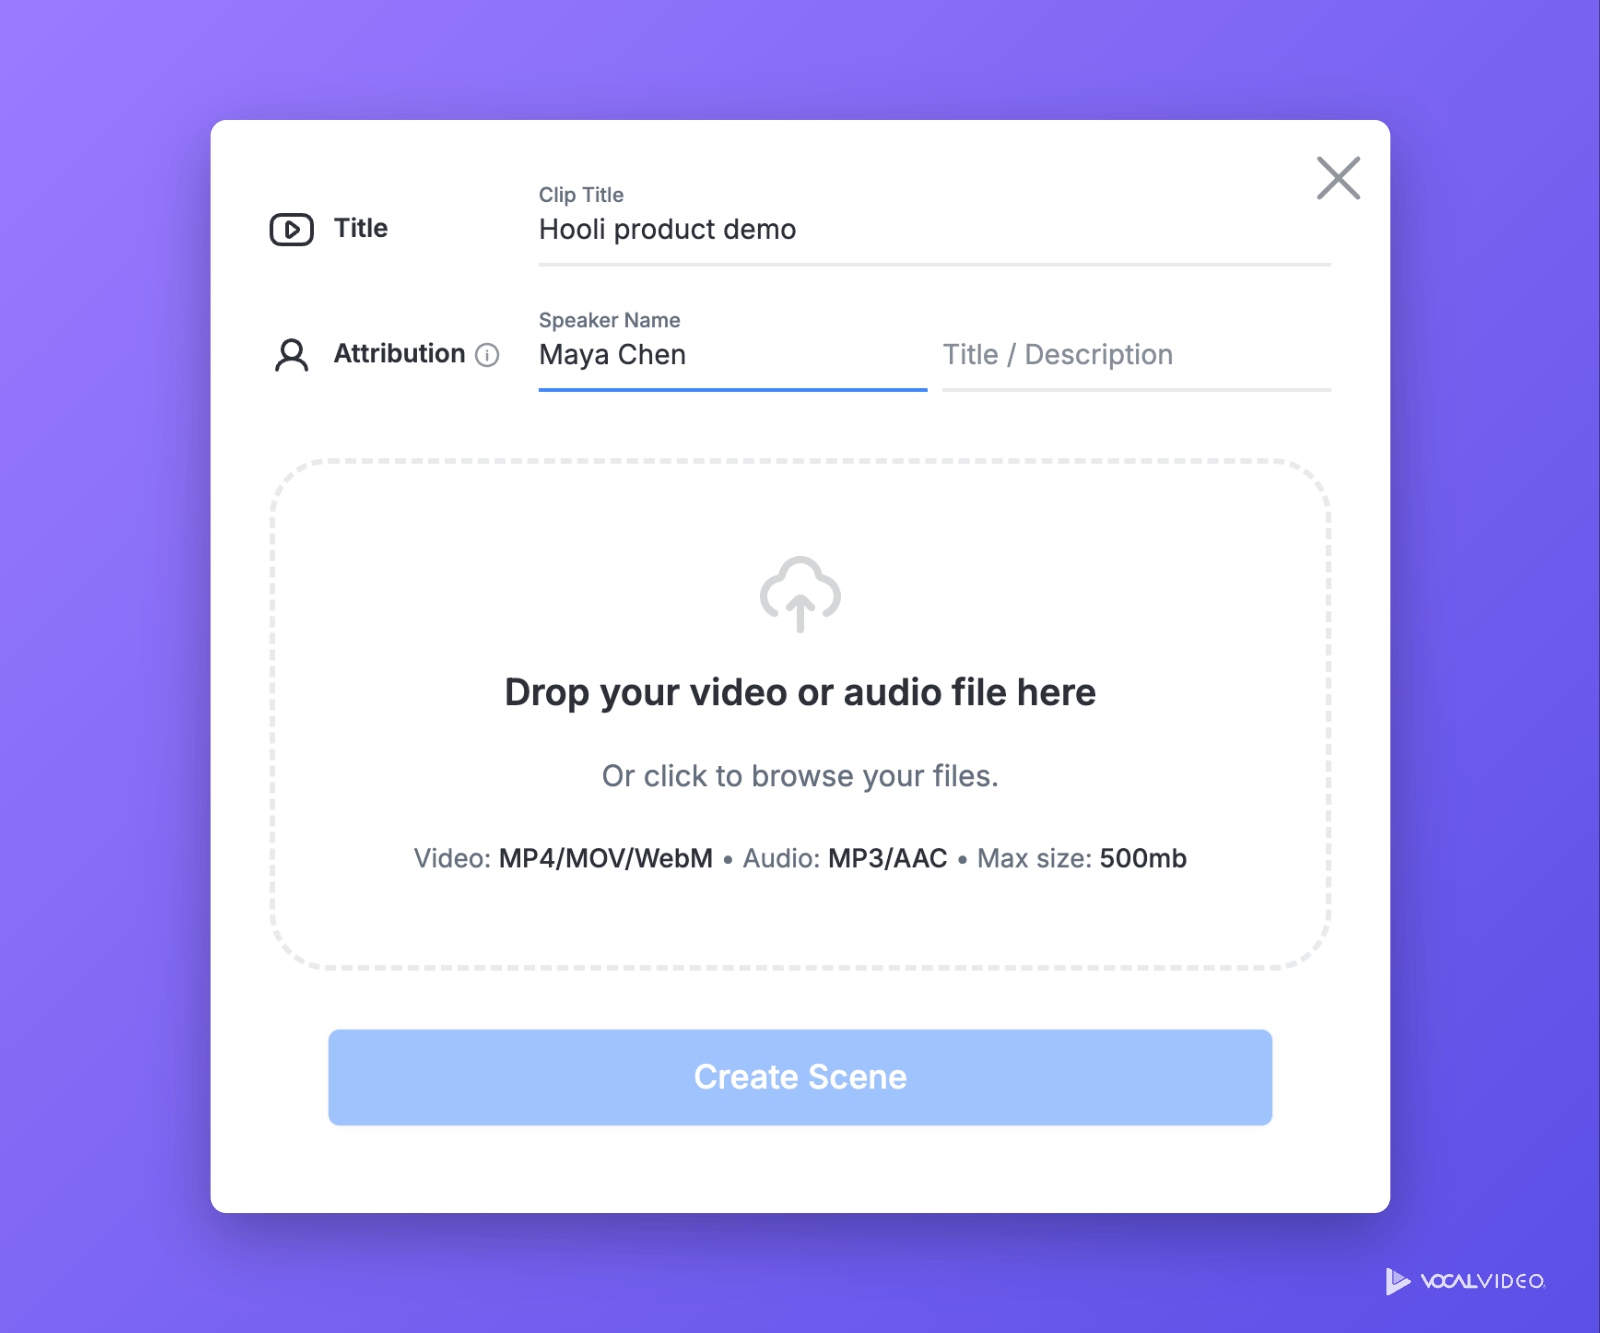
The new scene appears right away while your file processes. Processing takes a few minutes: we convert the file for the editor and transcribe any speech to generate captions. You can keep editing other scenes in the meantime.
You can also upload from inside the Add Scenes picker (see the next section): click Upload new, or drag a file from your computer straight onto the picker.
Every clip you upload in the editor is also saved to your Uploads library, so you can reuse it in other videos.
Add a clip you've already uploaded
- In the editor, click + where you want the clip, or Add Scene.
- Choose Video / Audio. The Add Scenes picker opens.
- In the Source list on the left, click Uploads. (Responses holds your collector responses, and Other videos holds scenes from your other videos.)
- Search or browse for your clip, and select it. You can select several clips at once.
- Click Add Scenes.
The clips are added where you clicked +, in the order you selected them. If you used the Add Scene button, they go at the end.
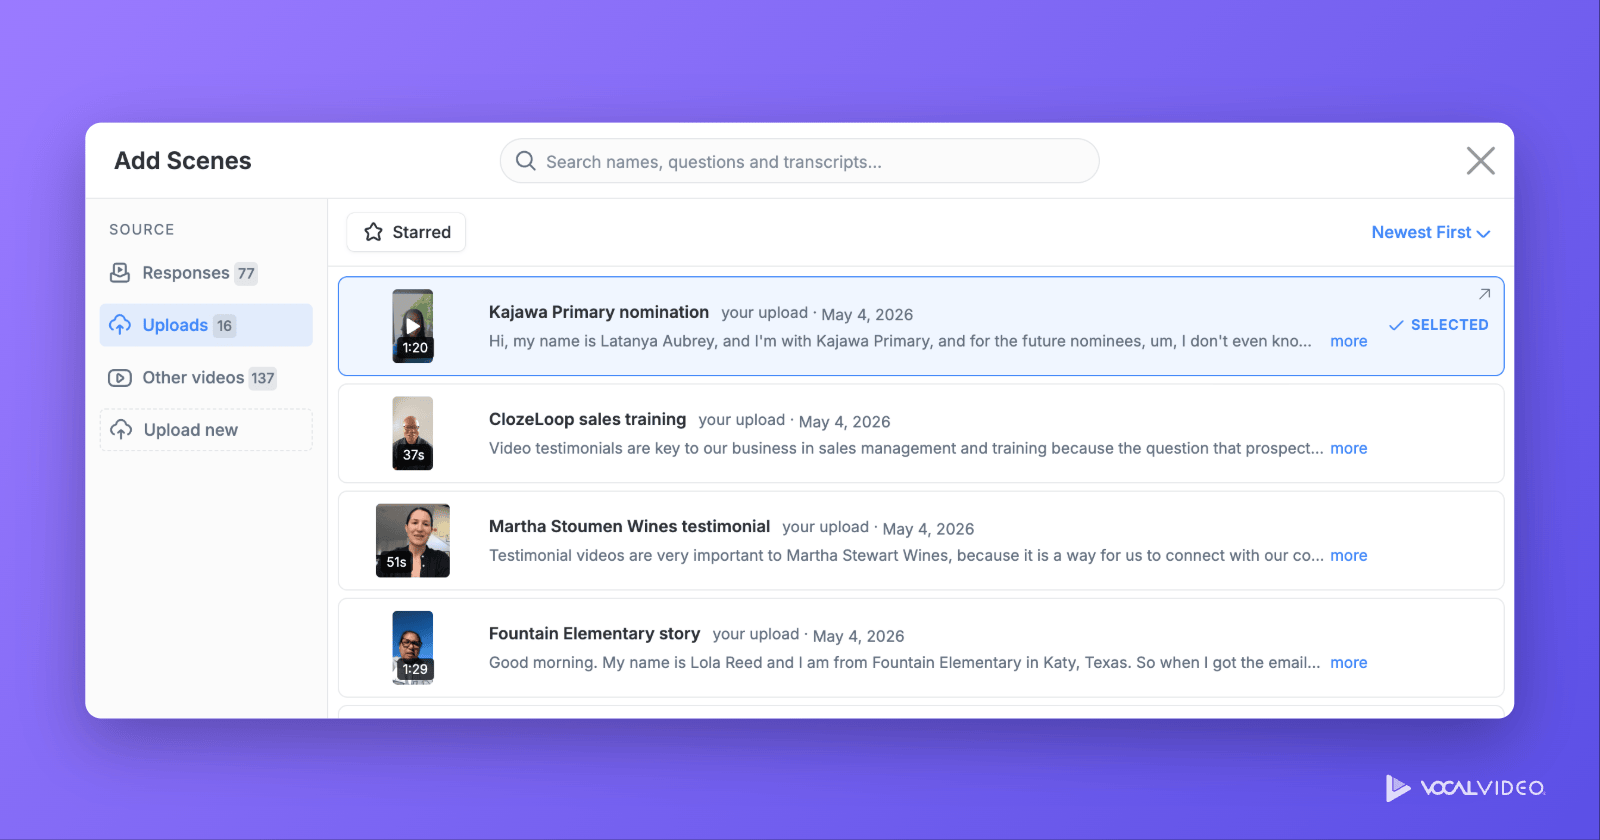
To reuse scenes you've already built in another video, choose From Another Video instead. It opens the same picker on Other videos.
Once a clip is in your video, you can trim it, edit its captions and attribution, and drag it to reorder, just like any other scene. See Editing your videos: a complete guide to the Vocal Video editor.
Replace a scene's clip with Swap Media
To replace the footage in a scene without rebuilding it, select the scene and click Swap Media in the scene toolbar (it's also in Scene Settings). Pick a different clip from Responses or Uploads, or click Upload new. The scene keeps its place in your video; only the video or audio changes. A video scene swaps to another video clip, and an audio scene to another audio clip.
Start a new draft video from an upload
From the Uploads library:
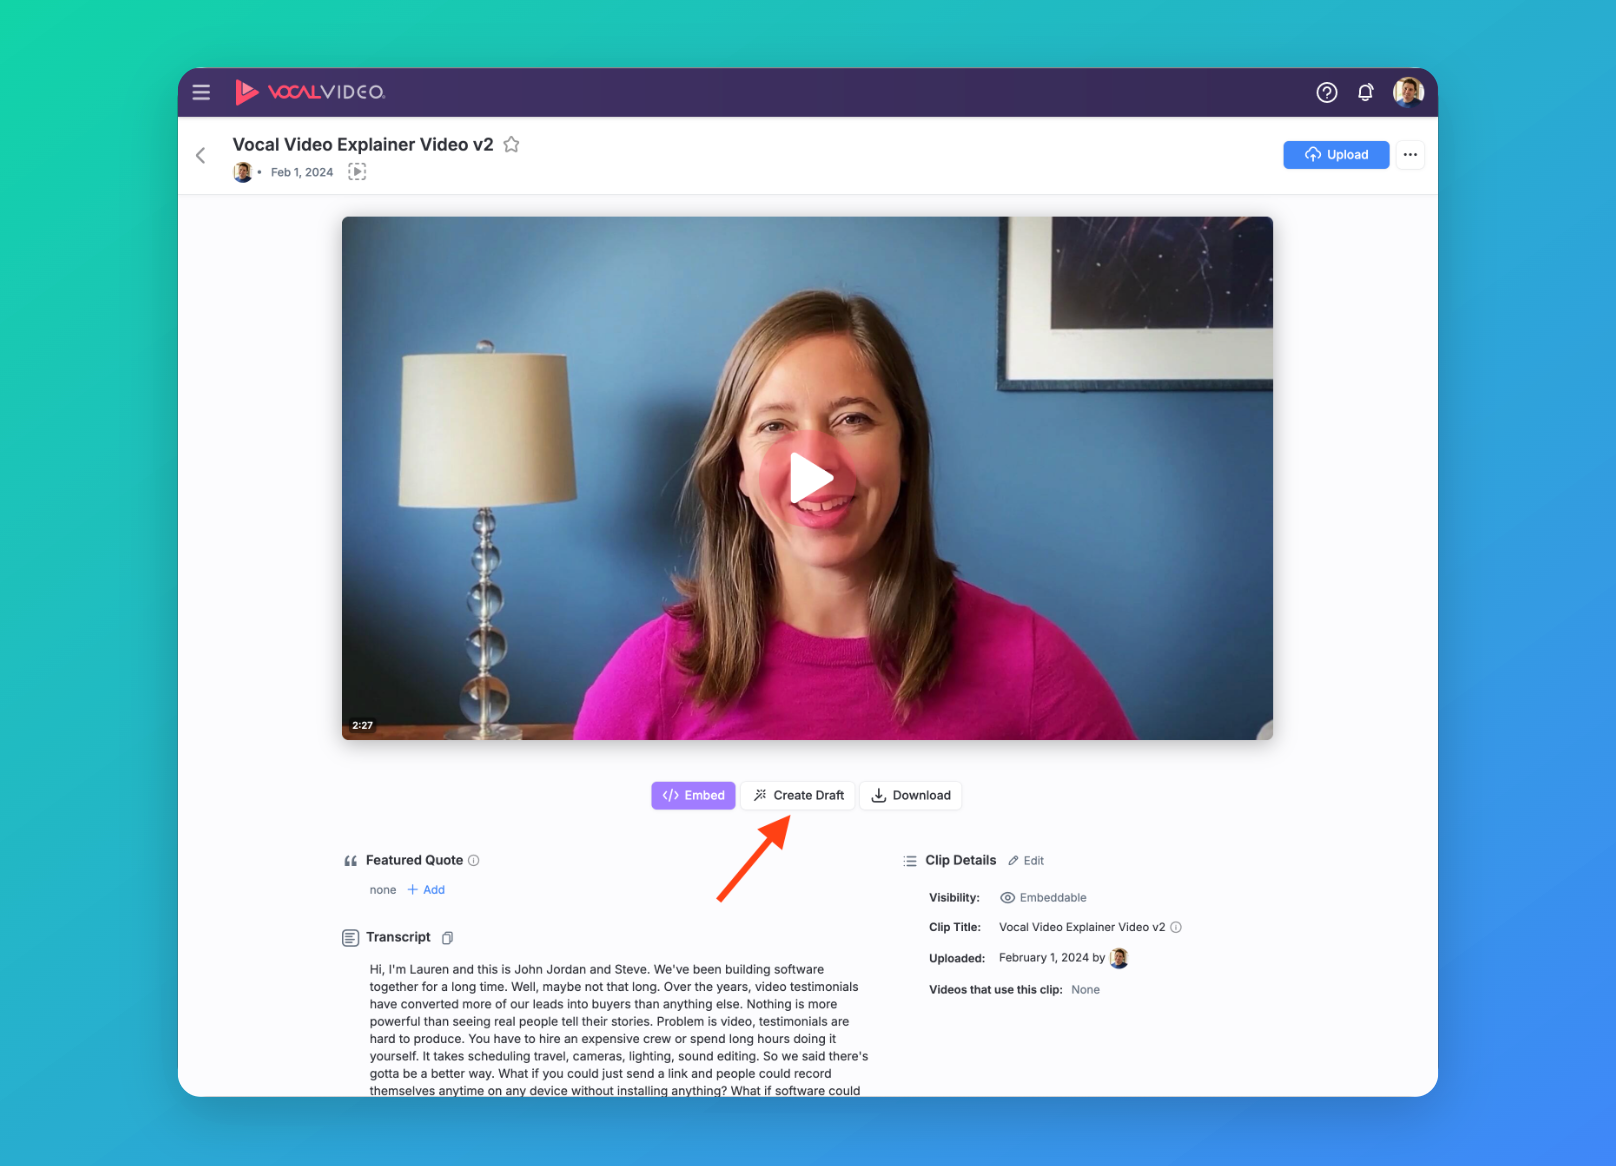
- Click Uploads in the left sidebar and open your clip.
- Click Create Draft. (The button is available once the clip's transcript has finished generating.)
- Enter a Video Title, and choose whether to add an Intro Logo Scene (an animated logo at the start) and an Outro Logo Scene (a logo with a customizable call to action at the end).
- Click Create Video. You'll get a new draft video built around your clip.
From a blank video:
- Click Create... > New Draft Video, name it, and click Create Video.
- In the empty editor, click Add Scene > Upload and upload your clip.
You now have a draft with just your clip in it. Add more scenes, edit, and publish when you're ready.
Your Uploads library
Every clip you upload, whether in the editor or from the Uploads page, is saved to your Uploads library (vocalvideo.com/app/clips, or Uploads in the left sidebar). Upload a clip once and reuse it in as many videos as you like, which is handy for logo animations, b-roll, intros and outros.
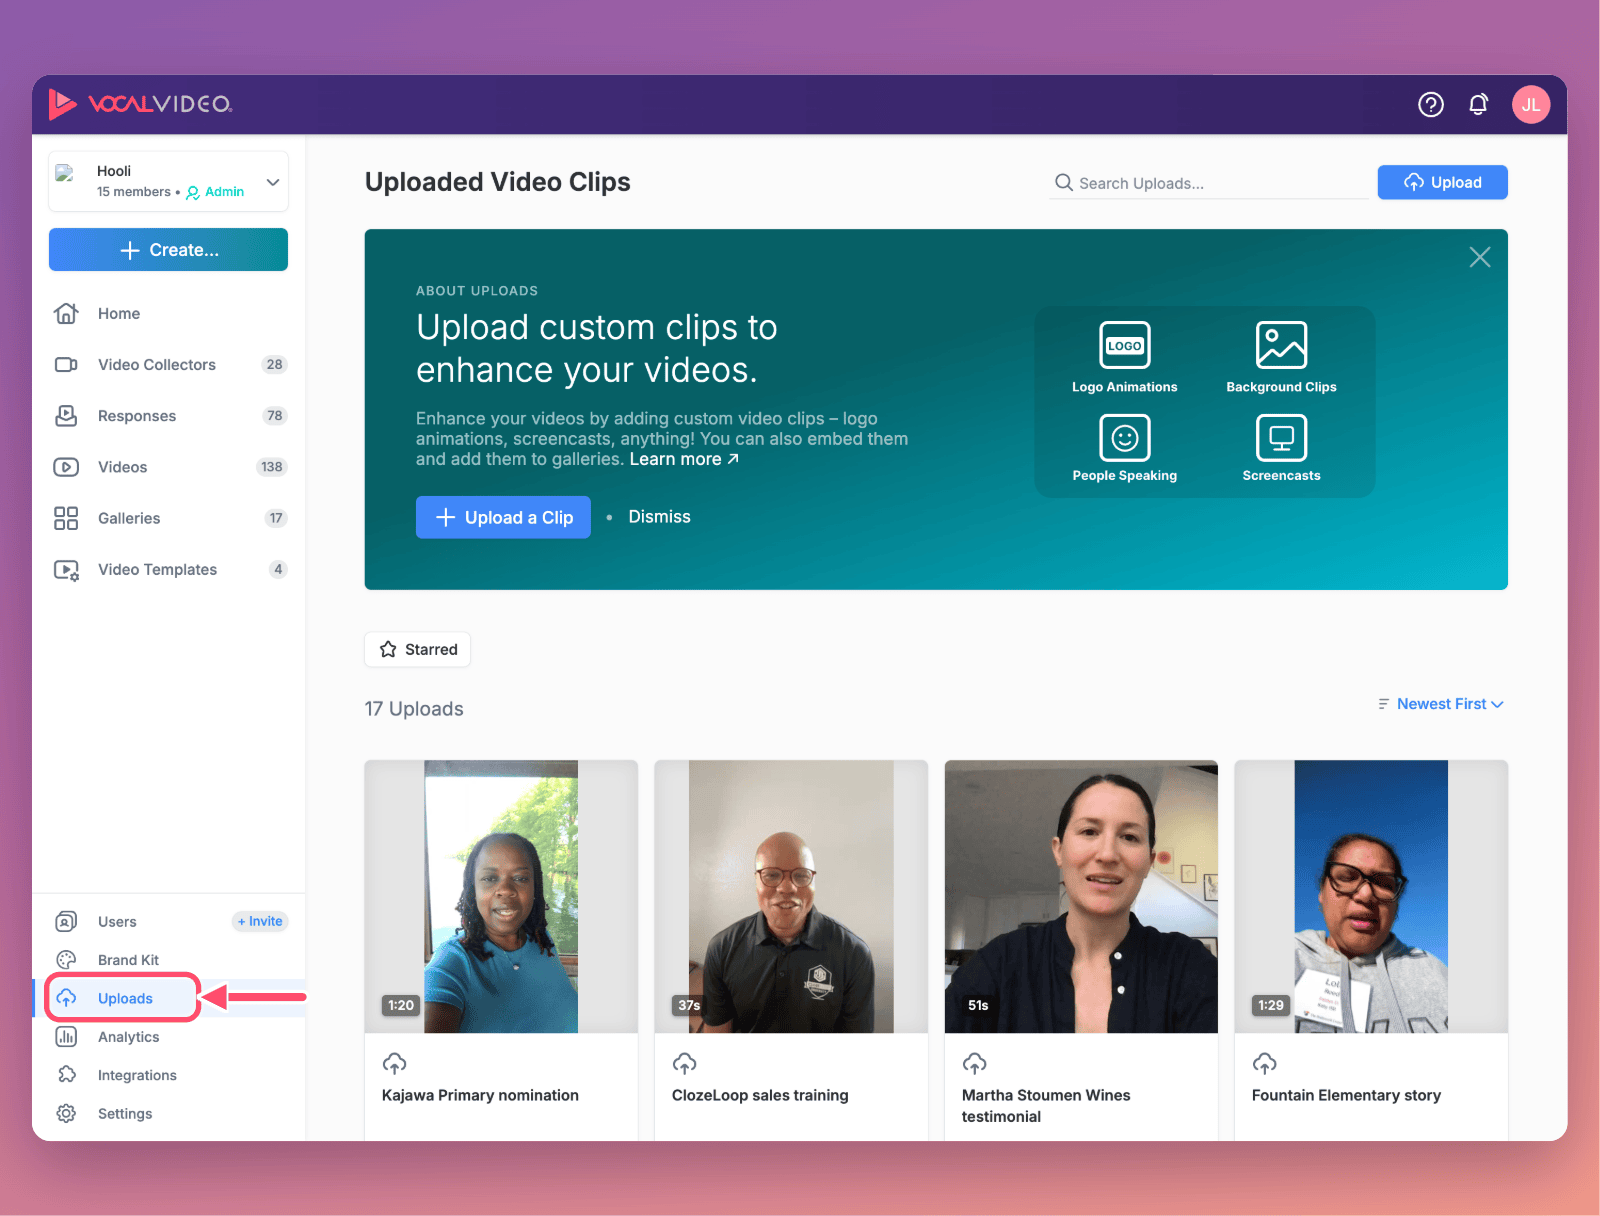
Note: Video collector responses don't appear in Uploads. Those live under Responses. Uploads only holds clips you've uploaded yourself.
To add a clip to the library without opening a video, click Upload on the Uploads page. This form also has a Visibility switch, covered below.
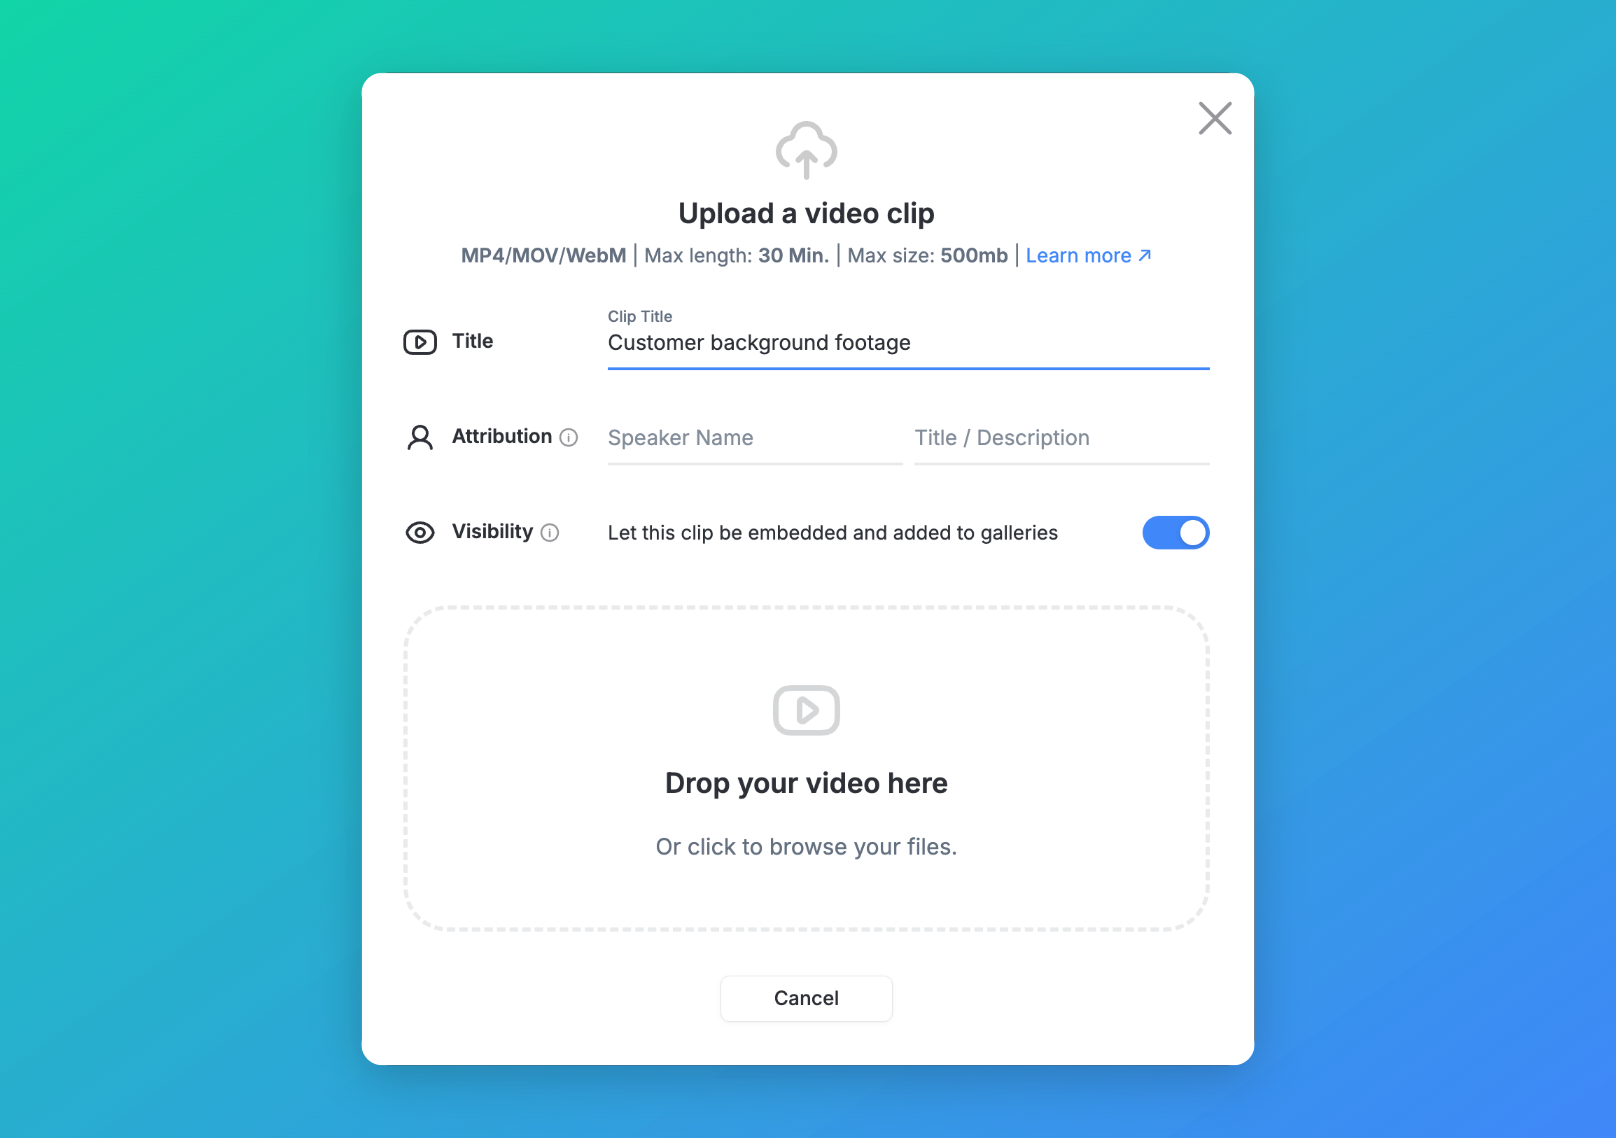
File guidelines & limitations
- Video: MP4, MOV, or WebM, up to 30 minutes long
- Audio (editor uploads): MP3 or AAC
- File size: 500 MB or under
- Uploaded clips count toward your video processing total.
- For most situations, we recommend uploading clips without background music. See Background music.
Embedding uploaded clips and adding them to galleries
Each uploaded clip is either Embeddable or Private. Private clips can still be added to your draft videos; embeddable clips can also be embedded on their own and added to galleries. Managing clip visibility requires a paid plan.
You set this per clip in your Uploads library, not in the editor: open the clip and click its Visibility under Clip Details, or turn on Let this clip be separately embedded and added to galleries when you upload from the Uploads page. The editor's upload form doesn't ask, so for a clip you uploaded while editing, change it in Uploads.
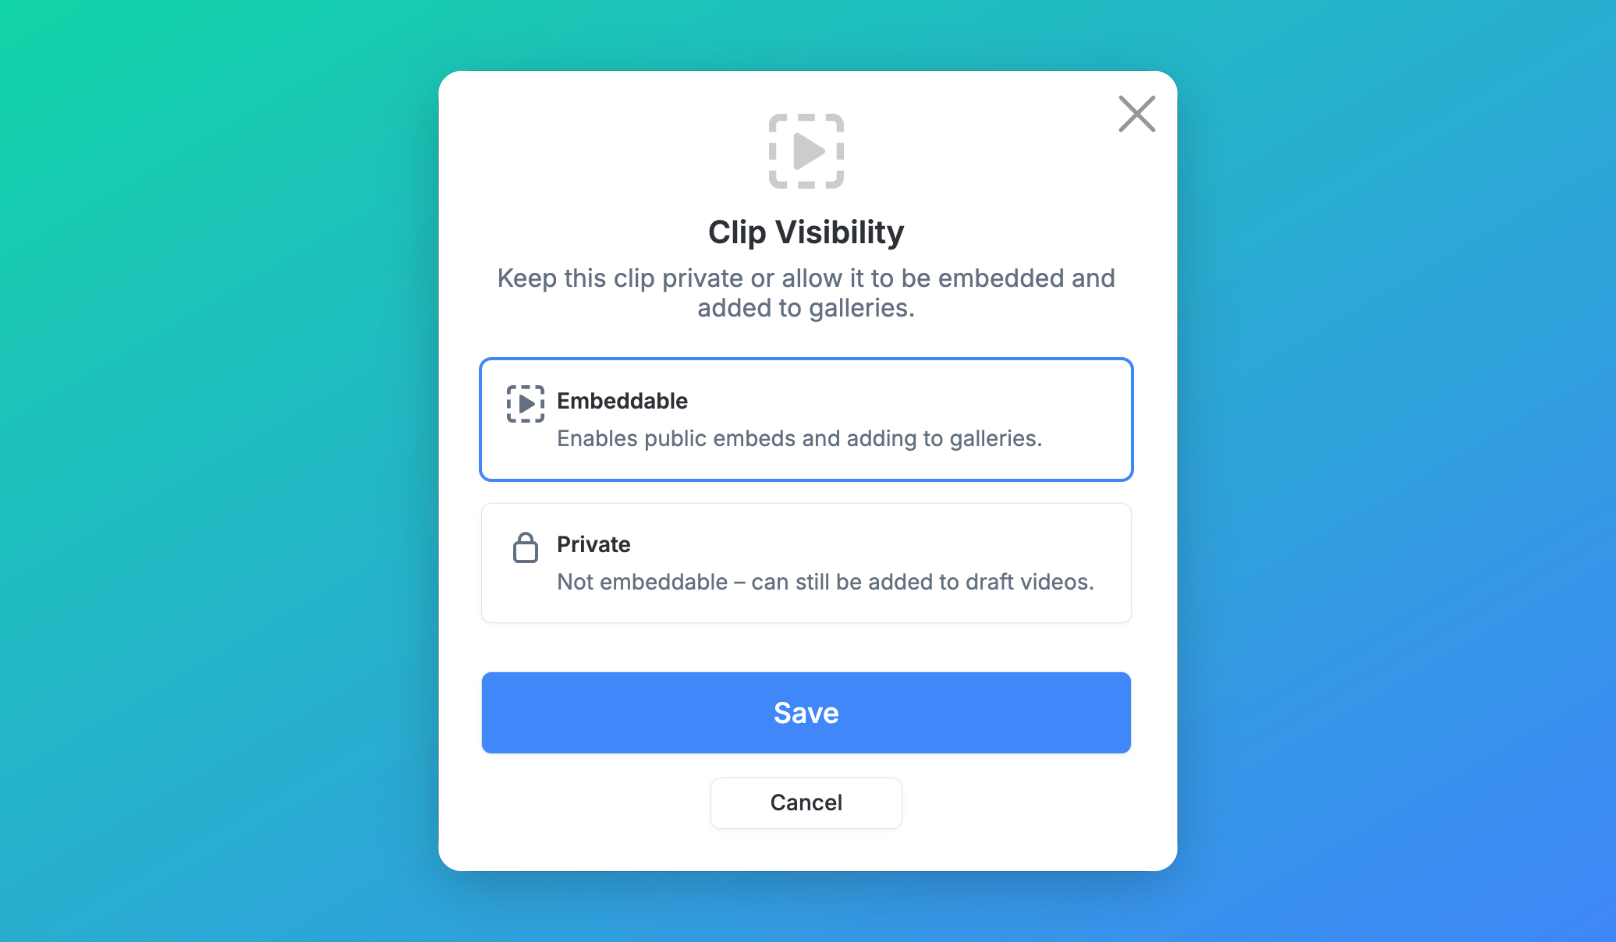
Once a clip is embeddable, click Embed on its page to create a video embed or card embed, just as with any other Vocal video, or add it to any of your galleries.
AI effects and logo animations
Background effects on uploads: Background blur, removal and replacement always apply to clips recorded through your collectors. For uploaded clips, they follow the Apply to uploaded clips switch under Background Effects in the editor's AI Tools panel. Turn it off if your uploads are logo animations, screen recordings or b-roll that shouldn't be touched. AI effects use AI credits when the video is first published.
A logo animation on every video: If you have an animated logo you want at the start or end of every video, upload it once and add it to a video template as a Fixed opening clip or Fixed closing clip. It then plays as-is in every video built from that template, instead of adding it to each video by hand.
Background music
We typically recommend uploading video clips without background music. Why? Because if you're going to combine your uploaded clips with other scenes, the background music won't play smoothly across your whole video.
To add background music to your video, choose one of our included soundtracks, or upload your own custom music file while editing your draft video.
Can I share my screen when recording with Vocal Video?
We don't yet offer screen recording. However, you can record a clip of yourself with a different platform and then upload it to your account as described above.
For more information see:
- Editing your videos: a complete guide to the Vocal Video editor
- Video Templates: the Complete Guide
- AI Credits: What Uses Them and What Happens When You Run Out
- How to Share and Embed Videos
Still need help? Contact Support at support@vocalvideo.com